Apple released iOS 6 to the public on 19th September 2012. Since the release of iOS 6 betas to the developers, iPhone Dev team has released redsn0w’s developer-only version. This version of redsn0w provides tethered jailbreak for iOS 6 on A4 devices including iPhone 4, iPhone 3GS and iPod Touch. redsn0w developer version only provides SSH access to the jailbroken device. It doesn’t install Cydia on iOS 6. iPhone Dev Team is still working to make Cydia completely compatible with iOS 6.

Before Updating to iOS 6:
If you are using a carrier locked iPhone, then stay away from iOS 6 update. The current jailbreak for iOS 6 is only available for iPhone 4, iPhone 3GS and iPod Touch 4. The jailbreak is tethered. There is no untethered jailbreak for iOS 6 currently. If you’re using iPhone 4S, iPhone 5, iPad 2, the new iPad or iPod Touch 5th gen, then you cannot jailbreak it currently.
How To Jailbreak (Tethered) & Install Cydia on iOS 6 Final on A4 Devices – iPhone 4, 3GS & iPod Touch?
1. Download iOS 6 and restore your iPhone 4, 3GS or iPod Touch via iTunes.
2. Download redsn0w
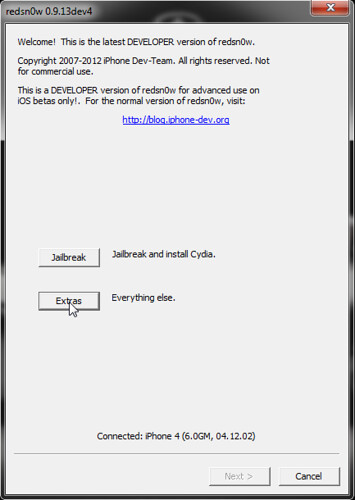
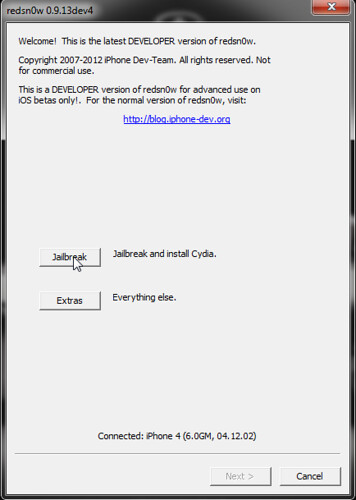
3. Launch redsn0w and click Extras.
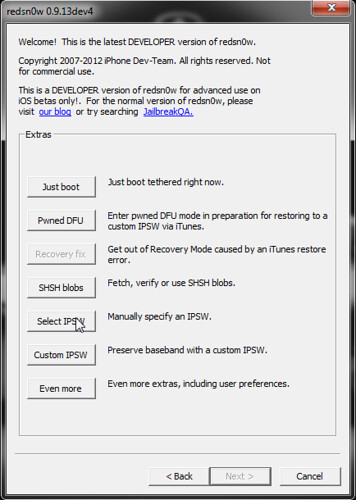
4. Now click Select IPSW.
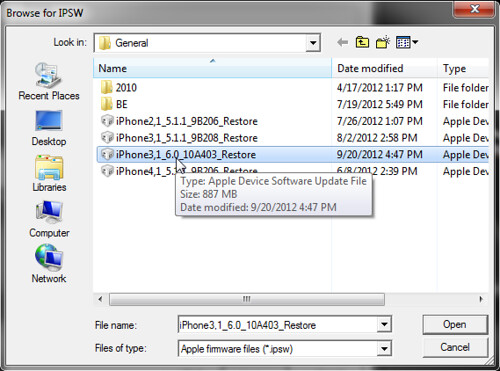
5. Now point redsn0w to iOS 6 IPSW file that you downloaded in Step 1.
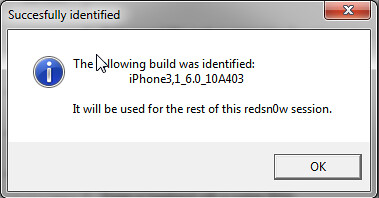
6. redsn0w will identify the IPSW file and show you the following dialog box:
7. Now go back to the main redsn0w screen and click jailbreak.
8. Now redsn0w will show you the option to Install SSH. You can also install custom bundles at this step.
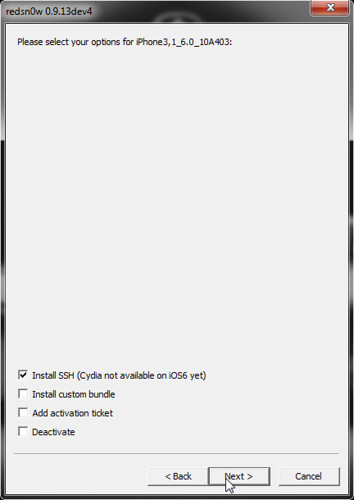
If you just want to jailbreak and install SSH, then click Next.
9. Now plug in your iPhone 4, 3GS or iPod Touch and turn it off.
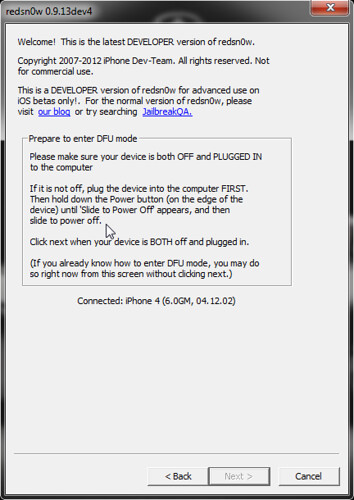
Click Next.
10. Now redsn0w will show you the instructions to put your connected device in DFU mode. Follow the instructions on the screen.

11. Once your device is in DFU mode, redsn0w will start exploiting the firmware & jailbreak related files will be copied to your device.
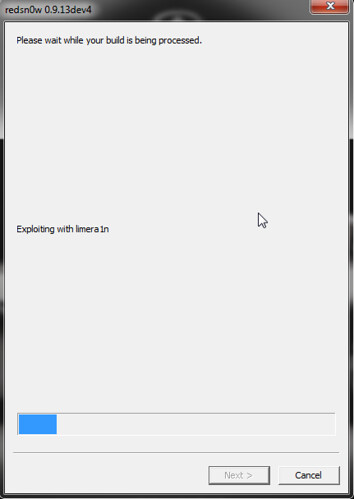
12. Wait for a couple of minutes till redsn0w finishes jailbreaking your iOS 6 device. Once done, you’ll get the following dialog message:

Note that the current jailbreak for iOS 6 is tethered. This means everytime your iPhone or iPod Touch reboots, you need to use redsn0w to boot it in tethered mode. To boot your jailbroken iOS 6 device in tethered mode, select Just Boot from Extras.
Also you must boot your device in tethered mode after the jailbreak to use Open SSH.

To install Cydia on your jailbroken iOS 6 device follow these steps:
1. Connect to your device via SSH. Use Putty on Windows or Terminal on MAC/Linux.
On Terminal, you can enter the following command:
ssh root@<IP Address of your iPhone or iPod Touch>
Enter alpine as the password when prompted.
I’m using Putty on Windows. Launch Putty and enter the IP address of your iPhone 4, iPhone 3GS or iPod Touch 4.
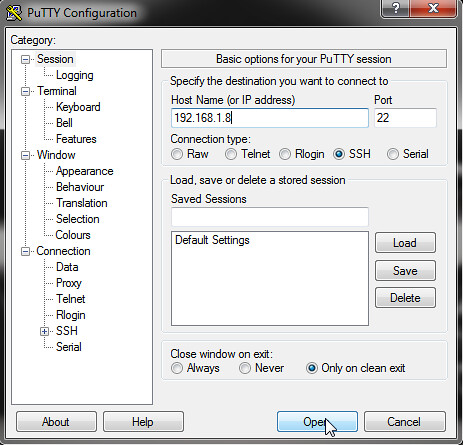
2. Putty will verify the IP address. After that you’ll see a login prompt.

Enter root as username and alpine as the password.
3. After login, enter the following command to install Cydia on your jailbroken iOS 6 device:
wget -q -O /tmp/cyinstall.sh http://downloads.kr1sis.net/cyinstall.sh && chmod 755 /tmp/cyinstall.sh && /tmp/cyinstall.sh
Cydia will be downloaded and installed. Wait for a couple of minutes. Once done your iPhone or iPod will have Cydia on it’s homescreen.
If you’ve any questions, feel free to ask below.
Warning: count(): Parameter must be an array or an object that implements Countable in /home/u265766359/domains/maheshkukreja.com/public_html/wp-content/themes/thesis_189/lib/classes/comments.php on line 43
{ 0 comments… add one now }